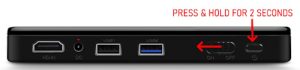
Switch the Power Setting to the “ON” position, press & hold the Power Button for 2 Seconds and release. Wait for 5 – 6 seconds to allow the projector to tun on.
If it does not turn on, plug the projector into a power outlet and repeat the above procedure.
- Mount your projector on the tripod in your preferred location.
- Make sure it is projecting an image of your preferred size onto a screen or lightly colored background.
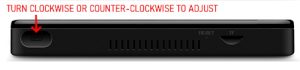
- Use the Focus Wheel to adjust the image to your desired sharpness.
If you previously connected the projector to your Wi-Fi, all up to 60 seconds to the connection to be re-established to display current time.
If this is your first time using the projector or if it has never been connected to your Wi-Fi, please access the user manual using the link below. Locate the section on how to connect to your Wi-Fi or HotSpot.
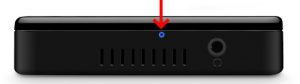
When you plug your P960X into an electrical outlet, a blue light comes on in the back of the projector. This light will turn off when the projector is fully charged.
Yes, as long as the Media Player has a, HDMI OUT Port. you can display images and videos from the following device types on your P960X (Select HDMI from main Menu)
- ROKU, AMAZON FIRE & OTHER MEDIA PLAYERS
- DVD/BLU-RAY PLAYER
- LAPTOP OR TABLET PC
Yes but only to play DVD Movies. 3D Blu-ray Discs (BD) will not play on the projector.
The projector can play 3D movies that are ripped to MKV or MP4 Side-by-Side (SBS) or Left-/Right (L/R) Format.
To Rip your 3D Blu-ray Movie to the above formats, you will need:
- 3D Blu-ray Movie Discs you actually own. You can purchase them for dirt cheap on EBay
- You will need the DVDFab Software
- You will need one or more 32GB TF Cards. You can also purchase these for dirt cheap on EBay
- Finally you will need a PC with a Blu-ray Drive
Once you install and start the DVDFAB software, pop your BD in the PC BD drive and simply follow the on-screen instructions in the software to ‘RIP’ your Movie to your TF card. * Make sure you select the Side-by-Side Format and also the lowest file size. You can find an excellent tutorial HERE.
Contact Us if you need further assistance. Just bear in mind, we cannot support the recommended software.
* Quick Format the TF card or USB Flash Drive to exFAT to save multiple large video files
- Insert your TF Card into the slot on the projector
- Power on and start the Video Player App

- Select the location of your video (Disc or Drive – TF Card)
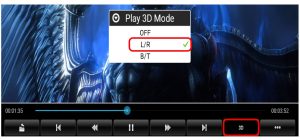
- Once the movie is loaded, click on the movie to bring up the tool bar and select the “3D” button. Now select the “L/R” option. the video will now refresh and start playing your 3D video.
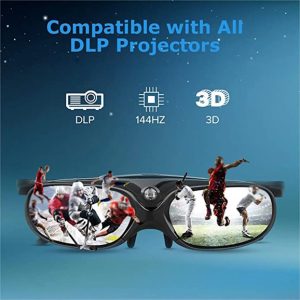
At this point, you will need your 3D Active Shutter Glasses to watch
Use the link below to order the 3D Active Shutter Glasses